Showing posts with label Safety. Show all posts

Sunday, September 22, 2013

Entry Safety

Last weekend we were down in Kankakee and as I watched divers enter the water, I was surprised that so many of them just do not know how to make a proper giant stride entry!

Now if you remember from your open water course, to execute this entry, you first complete your pre-dive safety check with your buddy.  Then, you step to the edge of the dock or boat swim platform.  You add a little air to your BC, secure your console with your left hand and your mask and reg in your right.  You quickly check that the water below you is clear, then look at the horizon and step off.  The key here is to STEP. It drives me completely bonkers when I see a diver hop off the dock!

The dangerous difference between step and hop is this: When you hop, you are briefly in the air, touching neither the dock/boat nor the water.  Now in the case of the boat entry, the danger is that the boat will move under you in that instant that you are aloft and you, or most likely your tank, will come crashing onto the deck, causing damage to your gear and the boat, as well as physical harm to you. You are not safe hopping from a dock, either.  If you are not really stretching that leg out, you may come down on the edge of the dock.  Again, the risk of harm to gear and person is great.

I ask myself, “How can I explain this better?”  Ok, Monty Python fans, remember the ministry of silly walks? Imagine making an exaggerated step into the water, looking straight ahead, clutching your console on the left and holding your right hand over your face, against the mask and regulator. Catholics, think if yourself genuflecting into the water, but instead of moving your leg backwards, you step forward.  Think of your bending knee hitting the water before the foot at the end of it.  How about Captain May I?   Captain, may I take one giant step off this dock?  Hopefully you are getting the picture.
...and now for some completely different entry techiniques.
Once the diver is in the water, I observed that divers either make the “OK” sign immediately upon bobbing to the surface,(how do they know yet if they are OK?) or they do not signal at all.  It should go like this: The diver strides into the water.  He continues to hold on to his mask and reg while he briefly submerges and then bobs to the surface.  While continuing to hold his mask with his right hand, with his left hand, he checks that the mask strap is still in place, and repositions it is needed.  He then briefly checks that everything feels alright and decides if he is OK to start his dive. He then signals to the surface support person “OK.”


This may seem like the ramblings of a crusty old dive-Nazi instructor, and I guess there are days that I may resemble one, but there is a reason why the skill is taught in a specific fashion.  It is for the safety of the diver!  I believe that most divers are careful about assembling their gear, checking their air, and planning their dive, but they forget that their dive can end before it starts if they don’t enter the water safely.

Sunday, June 2, 2013

Six Things to Do When Diving With a New Buddy

It is the beginning of the local dive season, and I am ready to go!  One thing that I hear many times at the shop is, “I’d go diving more often, but I do not have a dive buddy.”  The beauty of diving in a group is that it is easy to hook up with another single diver, or a duo that is willing to add a third person to their team. However, just as you would to take a few minutes to familiarize yourself with a rental car, you need to familiarize yourself with a new buddy.  Here are 6 tips to make pairing with a new buddy safe, stress free and enjoyable.

Number 1
Share your dive experience with your buddy.  Have you done a lot of freshwater diving?  Have you dived in this lake before?  Is this your first deep dive or night dive?  Find out those same things from your buddy, too, as a way to assess one another’s skills.  This is not a peeing match, but an ice breaker and valuable information that will aid in your dive planning.

Number 2
Get to know each other’s gear.  It goes without saying that any time a diver rents gear, he should thoroughly inspect it and be intimately aware of all the location of all the dumps, inflators and buckles, but do not forget that you also need to know your buddy’s gear.  Not all set ups are created equal. Different manufacturers have different buckle, weight pocket and deflation designs.  Chances are good that you will never have to dump your buddy’s weight for him, but if you need to, it is best if you already have an idea as to how it can be accomplished.  In addition, pay close attention to the location of your buddy’s alternate air source.
Photo by the amazing Liz Boomer
Check out her website!
Number 3
Plan your dive together.  It is folly to assume that your new buddy will dive the same way your usual buddy dives, or that he is going to follow you like a puppy and be interested in the same things that you are.  Discuss your dive plan, including max depth, length of time, and route you will take.  It will not go well if you want to stay shallow and shoot macro photos and he wants to make an 80ft. dive to penetrate a wreck, so come to a consensus on where you will go and what you will do while there. Good dive planning goes a long way towards making the most of your dives. While you are at it, review hand signals and consider bringing an underwater slate for good communication.


Number 4
Decide how you will dive.  Will you dive next to each other, one leading and one following, one above and one below, or in some other configuration.  This will save you both the bother of looking all over for your buddy.  If you know where your buddy is and he knows where to look for you, then a quick glance to the right or left (or up of down) will ensure that you have not become separated.


Number 5
Review buddy separation scenarios.  Even when you plan carefully separations can occur.  The rule of thumb is to look for your buddy for 1 minute, then slowly ascend (still looking in all directions), perform a safety stop, if required and then continue to the surface.  Hopefully your buddy will be there waiting for you, or will surface in a few moments.

Number 6
Dive your plan! Unless you have a foolproof way to communicate it, do not change plans while under water.  Stick to what you and your buddy have agreed to and save your alternate plan for your next dive.

I hope these simple tips will take the fear out of tagging along on one of Team Manta’s many excursions.  Not only that, meeting new people is one of the great benefits of the sport of diving, so get out there. Go places, Meet people and Do things underwater!

Sunday, May 26, 2013

A Quick Look at Meds and Diving


I am one of those lucky people who do not have allergies and rarely has a cold, so I am not generally up on the latest and greatest over the counter (OTC) remedies for sufferers.  However, this is a frequently asked question, so with the help of Divers Alert Network, I hope to shed a little light on this.

I have heard more than one diver complain recently about their allergies, especially in the spring.  In an allergy sufferer, an allergen, such as pollen, is inhaled in through the nose, causing the mast cells to release histamine.  Histamine release causes a lot of fluids to be produced, resulting in runny nose, tearing eyes, congestion and sneezing, all in an effort to flush that invader out of the body.  The bad thing is that once one allergen particle is flushed out, surely another will enter, reigniting the cycle.  

Antihistamines are readily available over the counter, but it is important to remember that even OTC medications have unwanted side effects.  Side effects of antihistamines include drowsiness, dry mouth, blurred vision and increased heart rate.  Increased heart rate can result in greater excitability in a diver, in some cases increasing the risk of panic.  Drowsiness can be particularly troublesome for divers, since it can be heightened by nitrogen narcosis. If you are someone who experiences drowsiness when taking antihistamines, you may have better luck with a non-sedating agent, such as Claritin or Allegra.  

If OTC antihistamines become ineffective in mitigating the symptoms, some doctors prescribe inhaled steroids.  This medication, sprayed up the nose, acts locally and therefore does not have the troublesome side effects of medications that act systemically.  The down side, however, is that it takes several days of treatment for them to work, so it requires some preplanning if a diver intends to use them on a dive trip.

Sinus congestion and its accompanying discomfort when diving can be the body’s response to a cold.  In an effort to get as much of the body’s infection fighting tools, such as antibodies,and white blood cells, to the site of assault, blood vessels dilate, essentially opening the flood gates so all of our body’s helpers can stream to the site of the infection on a river of fluids.  The result is a gunked up head.  

Decongestants containing sympathomimetic agents, such as Sudafed (pseudoephedrine), cause the blood vessels in the nose to shrink, thus closing the flood gates and relieving symptoms.  However, they can also increase heart rate and blood pressure.  Again, the danger with increased blood pressure and heart rate can make a diver feel “jittery” and less able to deal with problems underwater without panic.   These types of medication should be taken 30 minutes before diving, and care should be taken to assure that the formulation chosen will act for the full duration of the dive(s).  Alternatively, there are nose sprays that are very effective in opening sinus passages that will not cause the jitteriness, but as they cannot be used for more than 3 days in a row, they may not be the solution if a diver is experiencing symptoms while on a dive trip.  

It may be necessary to take some medications to save a dive or dive vacation, but caution should be exercised when using them.  Ideally, a diver should try a medication and monitor the side effects on dry land before attempting to try it while diving. Even if no side effects are noted during the trial, still remain alert to them on any dive, as the effect of diving on the way medications react in the body are not fully understood.  It is also important to investigate any possible interactions between OTC meds and prescriptions taken.  For more information, check the Divers Alert Network website, your local pharmacist, or your physician for the best up to date advice.

Sunday, February 10, 2013

Tank-full for Safety Inspections

While we stay busy in the winter months with classes and Try Scuba’s it’s also that time of the year at the dive shop when all the equipment gets the once over. We keep an eye on all of our equipment throughout the year but during the slower winter months every piece of equipment and gear gets an in depth inspection. It starts with the TANKs. All tanks or cylinders as they are referred to by the US Department of Transportation (DOT) and Compressed Gas Association (CGA) are required to undergo an annual visual inspection. Most SCUBA (Self Contained Underwater Breathing Apparatus) cylinders also need a hydro test every five years.  SCBA (Self Contained Breathing Apparatus) used by HAZMAT teams and Fire Departments as well as Fiber Wrapped Paintball cylinders are often on different Hydro  schedules. 

Last Saturday was tank inspection day.  I try to keep all the tanks that we use at Manta Dives inspected within the same month.  At Manta Divers we maintain 33 tanks.  24 of the tanks are Manta Divers rental fleet as well as 9 customers’ tanks that live at Manta Divers in exchange for letting us use them in a pinch. While most of the tanks are standard Aluminum S80 and S63 cubic ft. with 3000 lb working pressure we also have Steel  63 and 100 cubic ft. cylinders with working pleasures of 3442 lb.  


So why is it important to have tanks inspected annually?  Why is it important to the person filling your tank to do an exterior inspection of your tank and look for that inspection sticker on your tank?  If you could ask Hector Duran of Amigos Del Mar dive shop in San Pedro, Belize he would tell you that damaged tanks rupture and explode when re-filling them.  A twenty year veteran of the dive industry he died in October 2012 when a tank ruptured while he was refilling it.  Its protocol to check the Hydro stamp, Visual Inspection Sticker (VIS) as well as inspect the cylinder for any damage or condition that may of occurred since the VIS.  We look for deep scratches, gouges, dings, scratches, dents or extreme heat damage (fire).  It is still unclear why the tank Hector was filling exploded, but if he skipped any of the usual protocols, it could have led to his death.


It’s not just for the benefit of the person filling the tank to do the prefill inspection.  On September 11, 2011 Russell Vanhorn of St. Petersburg FL. died when the tank he was carrying into his condo exploded.  Although the cause has not been pinpointed all evidence points to a damaged tank that was filled without a prefill inspection or the tank was filled beyond its working pressure.  That’s why we follow the  protocols, OUR  SAFETY DEPENDS ON IT.


So what’s in an inspection?  It breaks down into 3 parts.

#1 - Exterior Inspection 

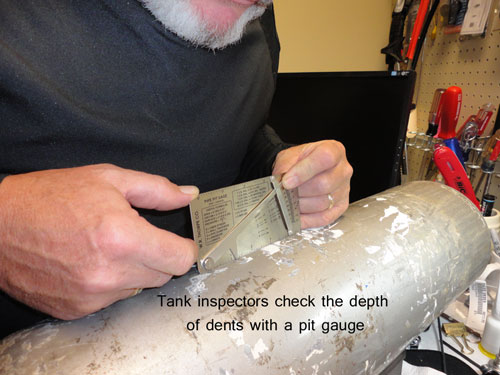
  • Look for scratches, dents, gouges, dings.  Any of these over .015 inch depth  can be reason to condemn a tank.
  • Look for heat or fire damage.
  • Use a straight edge to check the tank hasn’t bulged from overfilling.
  • Remove stickers and inspect the paint to insure that no repainting or repairs have been made
  • Remove the boot and clamps to look for pitting or rust that could compromise the cylinder.
  • For steel tanks we do a Hammer Tone Test.  Holding the tank off the floor by the valve I strike the tank with a fiberglass hammer. It should sound like a bell.  If it doesn’t the tank is most likely rusted out inside.

#2 - Interior Inspection
  • Remove the valve and turn the tank over on a clean paper to determine if there are any particles or contaminates in the tank.
  • After turning the cylinder upright “sniff test” the cylinder.  An oily or burnt plastic smell reveals that the cylinder has been refilled at less than a quality refilled station or off of a construction compressor.  Any odor will require the cylinder to be washed and dried to eliminate contamination.
  • After inserting an inspection light we look for pitting, oxidation, rust or other issues.  If pitting is present it is tested to determine if it isn’t extensive enough to condemn the tank. In aluminum tanks oxidation dust can be rinsed out in a wash. In steel tanks the rust is removed by tumbling with an aggregate or by whipping with special tools. The interior should be clean and dry.
  • A light and mirror is used to inspect the underside of the neck and threads.
  • I use a VISUAL PLUS system to inspect the threads. It’s like a microscope that allows the inspector to see every detail of the threads.
  • On Aluminum tanks manufactured prior to 1990 it’s a DOT requirement that the threads are EDDY tested every 5 years with the Hydro. Prior to 1990, some tanks were made from a 6359 alloy that was susceptible to thread cracking under a sustained load or pressure.  I EDDY test all aluminum tanks manufacture pre 1990 annually.  During an EDDT test a coil probe sends an electromagnetic current though the conductive threads.  A second receiver coil picks up the current and detects the presence of cracks or flaws.  If it fails the EDDY it’s a condemned tank.
  • The last thing we look at is the O-ring gland. It’s a depression in the neck of the tank that the O-ring that seals the valve sits in . It must be clean and free of scratches to seal the pressure in the tank.

#3 - Valve Inspection
  • The threads on the valve are inspected for damaged  or missing threads.
  • The dip tube is inspected to insure that its tight in place. (  the dip tube protects  you if there was water in the tank for whatever reasons it wouldn’t go in your regulator if you were upside down)
  • We check to the burst disc to make sure it’s in good condition and the right pressure.
  • We check the operation of the valve to make sure operating smoothly,
  • We check both of the O-rings. If either looks questionable we replace.

I hope this was informational about tanks, tank inspections and their importance. More knowledge makes us all better divers, but reading this blog should in no way be considered a class to certify you as a tank inspector or fill operator. Remember to check that your tank has been inspected by a professional and be aware of any damage to the tank.

Thank you for reading. As always, leave a comment and give us some feedback, share the blog on Facebook or tweet us out to your friends. Until next time, cheers.