Showing posts with label Dive Equipment. Show all posts

Sunday, October 5, 2014

Pet Peeves

Ok, as many of you know, I have been sitting here dry, recovering from my shoulder surgery.  In an effort to pass the time, I have been looking at other scuba blogs and I seem to notice a reoccurring theme: Annoying Diver Behaviors.  I’m sure we all have our “favorites,” and the following are mine.

The Space Hog:  There is not a lot of room on a dive boat, so it is imperative that each diver set up his gear and occupy as little space as possible. Assemble your kit placing your gear bag beneath the bench, I place my fins on the top of the bag for quick access. To further decrease my “footprint” on the boat, I like to attach my mask to my BC shoulder strap and wear my boots and wetsuit (pulled up to my waist.)

The Brief Skipper:  Both the boat briefing and the briefing for the dive site contain important information. You may never need to know some of it, like the location of the emergency oxygen or first aid kit, but if an emergency does occur, do you want to be the idiot standing there with your hands in your pockets, unable to help?  The dive briefing includes not only information about the dive site, but also information on entry and exit procedures.  You may be familiar with the site or the dive operation’s procedures, but others may need to hear the entire briefing, so kindly do not prevent them.  While the divemaster is speaking, shut your mouth and at least appear interested in the information.  This is not only the polite thing to do, but you may even pick up on something you hadn’t heard before.

The Dawdler: As mentioned above, it is best to keep your gear in tidy order for the sake of your boat mates, but this is also a strategy to aid you to quickly don your gear after the dive destination is reached. If all of your gear is in one spot you will not be that knucklehead rummaging through his bag for his flashlight while everyone else is waiting in the water.  Wisely use the travel time to get ready to dive.

Mr. First-in-Line: There’s one on every boat.  This diver needs to be the first to board, often without first asking permission from the captain or crew member.  This diver wants to be the first through swim- throughs, but often is not aware of his fins and screws up the vis for everyone who comes after him. This diver wants the first to get a look at anything the divemaster points out and then chases it a way. This diver departs the boat and monopolizes the wash out tubs with his gear.  Scuba diving is not a race.  When confronted with Mr. First-In-Line, I just steer clear and you can bet that I will not be pointing out anything to him until everyone else has seen it.

The Noise Maker:  One of the things I really like about diving is the silence, but occasionally, it is necessary to get the attention of your buddy.  This is where the quackers, shakers and bangers come in, BUT FOR GOODNESS SAKE, if your buddy does not respond after you have signaled to him, do not continue to make noise!  Swim over to them and tap them on the shoulder.  It is possible that they are busy with something they found on their own, or they already saw the thing you are pointing out, or they just cannot hear you. (This last one is what Mike tells me all the time.)  In any case, respect the silence of the activity and restrain yourself.

Mr. Bad Touch:  I am sad to say that photographers, in their pursuit of the perfect shot, are most often guilty of this crime.  The irony is that while this diver appreciates the beauty of the ocean, he is ruining it by touching the coral or finning on seafans each time he goes in to take a photo.  Divers should not touch anything underwater, and should be especially aware of where their fins are.  One way to really work on this is to dive in areas where the bottom is silty or otherwise easily disturbed.  Navigate for 40 kicks in a straight line, maintaining a depth 1-2 ft. from the bottom.   After 40 kicks, slowly turn around.  If you are faced with a cloudy path back, you know that you have some practicing to do.  Given that the waters around here are getting a bit cold, you may not be crazy about trying this out just now, but a good alternative is to participate in a buoyancy clinic.  As luck would have it, Manta Divers has one scheduled for Jan 10 and 11, 2015.  A course like Peak Performance Buoyancy is one that is worth taking more than once, as there are always little hints that can be picked up through guided practice and coaching from your dive instructor.  We all need to continue to work on our buoyancy.  One other note; if the dive professional on your boat should mention that you need to be a little more careful when diving, take it in stride.  Remember that the health of the reefs directly impact the lives and livelihoods of island peoples. 

The know it all. I always feel sorry for my newly certified divers because, once I set them free, they are immediately assaulted with advice from divers with experience who think they can improve on whatever the new diver’s instructor has taught him.  I would never say that diver education is complete when the certification card in earned, but there is something to be said for letting it all sink in and taking some time to apply what you’ve learned without someone trying to set you on another path.  Your advice may be good, sound and valuable, but is it wanted?  On a recent trip, my son was the youngest diver on the dive boat, and since his parents have a dive shop, most of his gear was fairly new.  One of the “senior” divers assumed that he was a new diver and “kindly” took him under his wing to impart his “vast” diving experience.   I would guess that my son has logged many more dives than this guy, but being the respectful person I raised, he nicely listened and then let it all run off his back, but the guy really came across as a boor and a know-it-all.  It is neighborly to help other divers and give opinions and advice, but only if it is wanted.  Before giving advice, ask if the person is open to hearing it.  If they are, they will be most appreciative.  If they are not, then you have just saved yourself some time and bother.


We’ve all had our weak moments when we have been guilty of some of these missteps, but the main thing is to try to avoid being “that diver.”  Diving is fun, you are on vacation.  Don’t’ race, relax and enjoy.

Sunday, June 29, 2014

Stories from the Repair Bench

Picture #1
It’s always sad when divers bring me gear that can’t be fixed or repaired, not because it got to be too old but because of improper care.  It’s also expensive. Take the diver whose dive computer gave up the ghost prematurely.  It didn’t have to happen. After close examination it was obvious that the diver’s air integrated computer with quick release  had not been properly rinsed after diving. ( see picture 1) Note the salt build up on the threads, O-ring and the bayonet quick release. It was obvious that without proper rinsing the salt dried the O-ring allowing salt and moisture to get into the computer.  End of computer.  You should always thoroughly rinse your gear at the end of every dive day. If you have done repetitive dive over many days it’s always a good idea to soak your gear overnight after washing it with recommended shampoos. This is true in fresh or salt water. While the aforementioned computer was the victim of salt water , fresh water can be just as harmful. Improperly rinsing in fresh water grows harmful bacteria. Check out picture #2. This diver regularly “Dipped” his regulator after diving to rinse it. That green stuff in and around the mouthpiece is mold. I didn’t take pictures of the interior but they were just as bad. It could have been avoided by flushing the inside of the regulator with clean water.
Picture #2

There are a lot of divers out there doing their best to keep repair technicians busy.  I was recently talking to another technician from the Chicago area and we were both sharing equipment horror stories. At one point he got out a box of little baggies containing things that they had found in regulators over the years. There was sand, gravel, hair, shells and plant to name a few. The best was the regulator that a diver brought with the complaint that it that tasted funny. No matter what tank he put it on the air had a horrible taste. My friend held up the baggie t contained the cause of the bad taste. It was a frog the got up into the regulator and after passing on dried to the inside of the regulator box. GROSS!  Remember, take care of your gear and above all, rinse all frogs out of it!


MIKE

Sunday, May 18, 2014

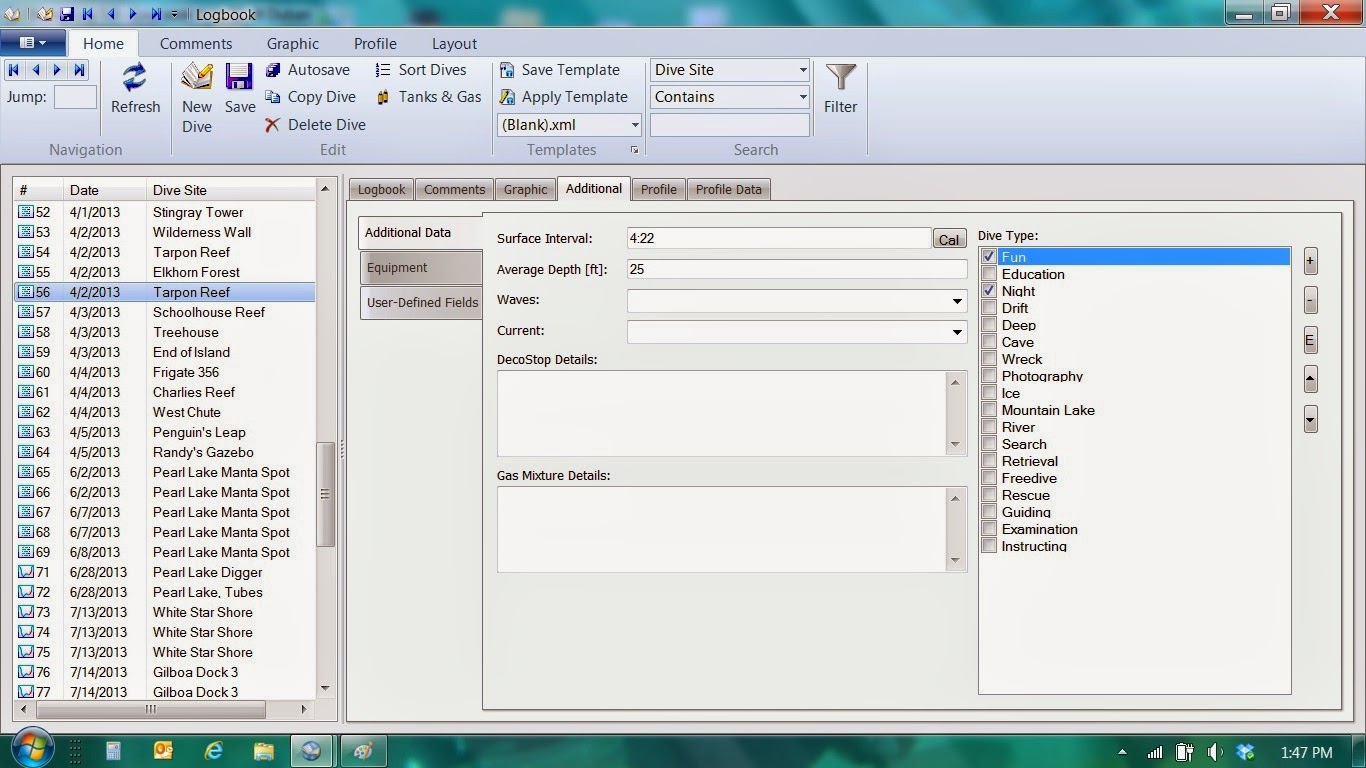
Tales of Tater: Dive Software Test


One of the first things we learn as divers is to fill out our log books.  It's important to keep track of the number and details of your dives especially as you progress with more advanced training.  I log each one of my dives and include notes, sites dive buddies etc.  The technical portions of the dives are copied off of our dive computers.  Items such as depth, time, dive time, surface interval etc.

With modern dive computers comes the ability to communicate from computer to computer.   Now we can download the information stored in the computer to a PC.  What`s the point of that?   Well actually there are several. I dislike the process using my thumbs to navigate through the menu on the dive computer.  I would rather let the computers do that.  I also dislike writing down all the technical details mentioned earlier.  It isn't terrible but I prefer to do it all at once when I feel like it rather than right after a dive.  I also like the ability to tie pictures that I've taken on a dive to the specific log off that dive.  It makes them both more interesting together.  Finally the biggest reason to do that is that I am a dive geek, in mathematical terms; Diver + Geek = Dive Geek = Tater. 

After spending some time on the Google machine to investigate, I found one of the packages that sounded the best was called Dive Log 5.0., the problem with it was the cost; roughly $50.  As any tightfisted engineer would know, you just don't plunk down some cash based on the marketing of a product.  But a good manufacturer will understand that and let you try it.  I downloaded the free demo and started to play with it.  I was not completely sold (Manta and/or my wife will enthusiastically confirm that I don't buy anything quickly)

$50 is a lot more money than my log book refills!! On the other hand since I don't have any quarry fees, motel stays or dive refreshments to buy until summer, $50 for a onetime fee doesn't see too terrible.  In a weak moment I pulled the trigger and ordered it.

One of the features I like the best about the software is the ability to connect my dive computer to the laptop and just download the most recent dives. I simply connect the cable from my Suunto Vyper to the PC using the provided USB interface cable, go to the download menu in Dive log 5.0 and press the button.  Dives are automatically added to the end of the existing dive log.  You can then edit anything about the log entry including the dive number.  This is a real must for several reasons.  First if you are like me you may want to enter a bunch of dives from before you got the dive computer.  Second, I don't consider every dive that my computer logs to be a separate dive.  Sometimes we just surface to adjust gear, get our bearings, help a student etc..  I often combine dives after they are downloaded.   I can take what the computer calls 3 separate dives of 3 minutes, 10 minutes and 15 minutes respectively and just modify the log into 1 dive of 28 minutes.  If I take my dive computer into a Manta Pool Session it gets logged as a dive and I can just delete that one. 


The details that are downloaded to a log will vary according you your dive computer.  A dive computer such as the Atomic Cobalt provides a lot more information that does my Suunto Vyper, but I have the ability to add to or overwrite any information that is downloaded.

Once you have the dive information logged in correctly you can really start to use the software as you like.  I always like to add a few notes to each log just as you would in a logbook version such as what fish you saw, who your dive buddy was, visibility etc.  There are a lot of built in information in the software that you can use such as dive buddies (which it keeps track of so you can just pick names or groups on subsequent dives),  Tank Pressure, etc.  You would sort of expect that in an electronic log and it is all there.  In addition, there are categories of dives that you can use such as Night Dive, Deep Dive, Teaching, Leading, etc.   These items are also tracked for other uses. But wait, there's more!!

One fun little tool is that you can use maps to track the location of your dives.  Not just say 'Pearl Lake' but you can attach an actual map location to it as you might with Google maps. This information is also stored and can be selected on future dives.

Another fun and/or useful things that the package does is give you the ability to get statistics from the stored dive logs such as how many of a particular type of dive, location of a dive, how many dives with a particular dive buddy,  how much total time under water, number of dives in a location etc.   Nothing like a nice graph to get a geek's heart racing :)

Probably one of my favorite features is the ability to add pictures to the dive log.   I take a fair number of GoPro pictures and while I sometimes make YouTube type videos out of them, I almost as often grab snapshots out of the video.  There is a drawback here that the software does not support video.  I spoke with the developer and he is hoping to add that to future versions but for now it only supports pictures.  You can attach pictures to each dive so that 2 years from now flipping through your log, you can tie the photo to the specific dive and dive log information.  I really enjoy this because I can now take the pictures from say Cayman Brac and directly tie them not only to Cayman Brac, but the specific dive, dive Buddy depth, dive site name etc.   I find that connecting the picture with the dive specifics makes the picture more interesting and also the dive log entry more interesting by tying the memory all together.  (This is especially helpful as I get old, senile and get in more dives)


 But wait!  There's more!!  Aside from the advantages of the software, they have a working relationship with other software vendors for both Android and Mac.   Who cares?  Well there is a big advantage there in my book. 

Many of us have done dive trips to remote tropical locations.  One of the big problems with flying with dive gear is packing. Weight and space for a dive trip are at a premium and can be very expensive if you go over the restriction.   Well one of the things I carry with me on trips is my laptop.  I have an older 15" Dell that I take mostly to use with my GoPro so I can download the video.  Mine weighs a few pounds and is about 2 inches thick.   What if I didn't have to take it?  What if I could use a 7" tablet and download save all of my video files to the tablet or a memory stick?  Well I can.  And now I also have the ability to download my dive computer to my tablet.   Dive Log 5.0 works with an Android application called Divemate USB.   I can load all of my electronic dive logs (minus pictures) onto a cloud application called Dropbox and use it to transfer all of my log information onto my Android tablet


as well as my phone using Divemate.  


It is a separate application but holds all the same information except the pictures (pictures can be added to but are not automatic and I wouldn't waste the memory space).  It is two way sharing in that I can also use Divemate to download new dives from my Vyper directly to my tablet and Divemate will allow me to transfer the information back to my PC and the Dive Log software through the Dropbox.  Oh man Jimmy Ray you gotta be lovin' this!!!

I love the fact that I can use both packages for the same information and each has some advantages.  For example Divemate has a built in feature of combining dives, which I previously mentioned I do manually in Dive Log.  But I much prefer the Dive Log software because of the statistics and generally more comfortable viewing on the larger screen. 

I don't claim this is for everyone and there are a couple of drawbacks.  If you want to log previous dives to catch up to your current dive (which you do not HAVE to do) you either need really good information or it can distort some of the statistics that it produces.  For example if you don't have a detailed record of your tank pressure delta on a given dive or dives, it will be included in your SAC calculations and can throw that off.  

If I lived somewhere I could dive 150-200 dives a year, I might skip all the features and just use it because it was easier but since I generally have several months of the year where all I can do is dream about diving and re-live past dives, I really do like the product and messing around to find all kinds of things such as number of dives at a given depth, temperature, number of dives by month, number of dives with particular dive buddies, training dives, night dives etc. as well as being able to put the right pictures with the right dives. And oh boy, who doesn't like a good graph??    But wait, there's more!!


Call Manta Divers now and get a free air fill with any gear purchase over $200 with one easy payment.  Yes you heard right, that's a $10 savings if you call now.  Operators are standing by.

Photo Credit: All Photos in this blog post are the work of Scott Durban

Sunday, March 9, 2014

The Six Things of Regulator Maintenance

Recently my repair area has been really busy. Good divers want to make sure their gear is well maintained and working well when you need it. The number one piece of equipment divers want to keep well maintained is your regulator for obvious life support reasons. It amazes me that from time to time I will get a regulator in that hasn’t been serviced in years yet the diver has been diving with it right along. The “if it’s not broke, don’t fix it” idea just doesn’t fit with regulators.  Even if it hasn’t been used for a couple of years your regulator should be serviced as o-rings, seats and poppets can dry out and fail when you’re diving. Not the surprise that I want at 60 ft. So her it goes:

Six things you need to know about regulator maintenance.

Number 1
Have your regulator inspected every other year and rebuilt in the years between inspection years. This is the schedule recommended by most regulator manufacturers. If a regulator if in a high use situation it’s recommended that the regulator is serviced more frequently. There are exceptions such as the Atomic T3 regulator, which requires rebuilding every 3 years or 300 dives. When your regulator is serviced make sure that the tech uses only manufacturers parts kits AND that they change all the hose O-rings as well.


Number 2
Manufacturers don’t require that the tech replace the exhaust vales as part of the  rebuild of the second stage and octo. It’s recommended that the tech inspect them and replace them only if they show signs of wear or they are leaking. I replace them every time I rebuild, since as with O-rings, they are made of silicone or rubber and dry out with time.


Number 3
Although the manufacturers mostly call for the second stage diaphragm to be replaced only when they are torn or deformed, I replace the diaphragm on every third rebuild. Again, like the O-rings and the exhaust valve it’s made of silicone rubber and can dry out and fail. They cost about $12 and I don’t charge anything to install. That’s $2 a year for peace of mind.


Number 4
More and more of our divers are using comfort swivels on their second stages and HP Quick disconnects for their computers. Both of these upgrades have O-rings and need to be serviced at the same time as your regulator. It shortens your dive if there is steady stream of bubbles coming from your swivel or QD.


Number 5
What’s an HP air-spool and why should you be concerned about it?  An air spool is a tiny pin between your High Pressure gauge and your HP hose. It has two little O-rings that seal the connection. It’s not typically part of the regulator rebuild or the rebuild kit I change them N/C with every rebuild. It adds security that you won’t have a blow out and have to miss a dive.


Number 6
Even if you haven’t done a lot of dives during the year you should change the battery in your computer at least once a year. Every year and absolutely before a dive trip. The cost before the trip is less than having to rent a computer during the trip.

These are the six things to think about on servicing your regulator. If there was a seventh, I would say don’t wait until the week before your trip or the beginning of the season to get your regulator in shape.


Mike (mook)

Sunday, October 6, 2013

The Six-ish Things About Gear Storage

On October 6th I will do my last dive of the season. Getting my new hip on Monday October 7th and my next dive will be in Curacao on January 12th,2014.  Generally, as an instructor, the dive season may end but with try scuba and confined water classes my gear never really dries out. It gets used year round. I realize that for the first time in years my season really will end, or at least take a short break. So, like others that end the season I have to store my gear.  It brings me around to the six things that I must do with my gear to ensure it will be good to go when we head off to Curacao in January.

Number 1
Give your wetsuit, hood, gloves and booties a good washing with wetsuit cleaner and extended rinse in fresh water. As a last step, I recommend a 5 minute dip in Mirazyme to kill any residual bacteria that will cause it to develop a stink in storage. After it all is totally dry, inspect the gear inside and out. Look for loose stitching at the seams or tiny tears that could spell trouble down the road. As I teach in my Equipment Specialist class, I like to use Aqua Seal for these repairs. As they say a stitch in time saves nine. Hang your wetsuit on a wet suit hanger in a cool/warm dry place. The rest of the gear can be stored on a flat surface if you don’t have a gear hanger. Put the inserts in your booties.

Number 2
Give your regulator a total wash and rinse. Pour a little Listerine into your second stages to kill bacteria. Make sure to rinse the second stages well. Inspect the mouth pieces and replace if necessary.  Lastly, look at you hoses for cracks, splitting or kinking. Replace if necessary. I like to wipe the hoses with  UV TECH to keep them in shape and extend their life. If it’s time to have your regulator serviced bring it in. Don’t wait until 2 days before your leaving for your trip.

Number 3
Give your mask a good look. Check the straps, frame and lenses. Wash well with warm soapy water using a soft paint brush to get into the folds of the silicone skirt. Dry well and store in the box that it came in.

Number 4
Inspect your fins. Check the straps and clips. After washing in soap and water, wipe them down with UV TECH. It extends the life and color. Store your fins flat with the inserts in the foot pocket.

Number 5
Go over your BCD. Look at the stitching, clips, d-rings and straps. Check out the low pressure inflator. Give the mouth piece the same treatment as your second stages. Give the BCD a good wash and rinse inside and out. I use BC Cleaner on the inside of the bladder and rinse with clear water. To check if the bladder has any leaking problems fully inflate and set aside overnight. If it’s flat in the morning you should bring it in for service. After adding a little air hang your BCD on a BCD hanger next to your wetsuit.

Number 6
Don’t forget flashlights, knifes and computer. They should be washed, rinsed and hand dried with a soft cloth. Wipe the flashlight case with UV TECH and remove the batteries for storage. Nothing kills a night dive like exploded batteries in you flashlight. Pay attention to the knife sheath, making sure it is thoroughly clean. Oil the knife’s blade before storing. Make sure that your computer contacts are dry before storing. More computer battery life is lost by damp active contacts on land the diving underwater. Check your battery in your computer or replace before you travel or start a new season. Batteries usually last about two years, but replacing your battery before leaving for your trip, even if it has not been two years, is cheaper than losing a day of diving.  Remember that batteries discharge over time even when not in use.

Number 7?
OK , I said six things but it’s really seven: Check your travel gear bag. Look for tears, wear and broken straps.  Clean wheels and zippers to ensure smooth operation.  It’s also good to lube the zippers and wheels. WD40 works well on the wheels and we have Zipper Tech available at the shop.

Sunday, September 15, 2013

OCTO Neglect

Hey you, over here! I’m the yellow one, your OCTO.  OCTO’s seem to get a back seat when people wash out their gear after diving. I see this often, even with experienced divers. Yesterday a diver bought in his regulator to be looked at because it was suddenly leaking and wouldn’t stop. After a quick inspection of the exterior of the regulators and hoses I opened up the OCTO. Ewwww!  Gross! Nasty! Inside the OCTO there was sand and muck in addition to a deposit of phlegm-like slime growing.   I shuddered at the thought that someone might have to put this in their mouth. It would be like sucking on a moldy piece of cheese.

OCTO neglect is an epidemic.  When servicing regulators, I find, almost across the board, that while the rest of the divers gear, including the  primary regulator, have been impeccably cleaned, the OCTO is in terrible shape. I think that OCTO’s don’t get a lot of attention when cleaning because they are used so infrequently.

 If you’re thinking, “It serves you right if you have to breathe off a moldy octopus if you don’t check your SPG often,” then you’ve probably never been in a situation where you had to use your own alternate.  I did.  I was making a shore entry and was knocked over in the surf. My primary regulator was ripped from my mouth and pinned under a piece of coral.  On my back and submerged by waves, I had no choice but to grab my OCTO and breathe from it.  I was happy that it was clean and functional.
Another reason that an OCTO can be dirtier than the primary is that divers do not always secure their OCTO to their BC, leaving it to drag in the sand, muck, or whatever, collecting dirt.  For $1.50, and a little care when setting up, that problem can be solved.

After giving the OCTO a bath in the sonic tub and spraying it with and oral disinfectant I made an internal adjustment, reassembled and returned to the customer, with a sales pitch for a new OCTO holder.

We all hope that we are never in a situation where we need to use the octopus, but if the situation arises, can you be sure that your alternate will be up to the challenge?  When rinsing out your gear post dive, don’t forget to rinse and care for your OCTO.


Maintenance tip:  Occasionally soak your primary and OCTO overnight in a solution of 1.5 cups of flavored Listerine and 4 cups of water.  The next morning, rinse well and you have minty fresh CLEAN regulators.

Sunday, March 24, 2013

Well Regulated


Well, we received a request for another techie blog, so we turn to out resident equipment guy, Mike!


Customers and divers often ask me to how a regulator works and why it’s called a Regulator. The second part of the question is easy. It’s called a regulator because the first stage regulates the pressure from the tank to the 2nd stage. It takes the pressure from a full tank at 3000 PSI to 135-140 PSI in the low pressure hose between the 1st and 2nd stage. This is called the intermediate pressure. Because your respiratory system can only tolerate a differential of about .14 atm/bar you wouldn’t be able to breathe though a hose at 10 ft.   The increased atm/bar would be enough to not allow you to draw in a breath of air. The regulator delivers air at a pressure the same as the pressure of the water surrounding you and continues to increase or decrease the pressure as the exterior water pressure changes around your body. The regulators that we use today are called open circuit regulators.

Scuba regulators are also called demand regulators because they deliver air on demand when you inhale. First stages generally are either a piston or diaphragm design. They both use external ambient water pressure and a spring to open the valve inside the first stage when the pressure on the low pressure side of the 1st stage drops below 135-140 PSI.  In the piston regulator the external water pressure and primarily the spring forces the valve open when the pressure drops on the low pressure side of the regulator. As pressure comes back to the intermediate pressure the piston moves back and closes the valve. The spring does most of the work but if the spring chamber was not open to the water coming and going the chamber would create a vacuum and the valve would not be able to open or close. To set the intermediate pressure on a piston regulator the unit must be disassembled and shims added or removed to get the right spring setting.  

A diaphragm regulator works on the principle of an open circuit system with one major difference. In a piston model, the valve set remains fixed and the valve orifice on the end of the piston moves opening and closing the valve.  On a diaphragm regulator, when the intermediate pressure drops on the low pressure side, the spring pushes on the diaphragm that pushes on a pin that opens the valve by pushing the valve seat away from the valve orifice, opening the valve. As the intermediate pressure returns to the intermediate chamber it pushes the diaphragm in the opposite direction and it closes the valve maintaining 135-140 PSI in the low pressure supply line.

The second stage is the final piece to the SCUBA system. There are a variety of internal designs in the second stage ranging from a simple rocker arm and single spring to a more complicated shuttle valve and multiple spring designs. They all deliver breathing air but the shuttle valve second stages are much easier breathing. (Manta divers only sells the better balanced first stage and shuttle valve second stages regulators. The Atomic Z2, Aqua Lung Legend LX Supreme and Titan LX Supreme are the only regulators that you will find in our rental Fleet). The diagram attached is a rocker arm and spring design. So here’s how they work. The air in the second stage is always equal to the ambient pressure on the outside of the regulator whether you’re at the surface or at depth.  If you closed up the mouth piece on a pressurized second stage and lowered it down to 100Ft depth, all the way down the ambient pressure would push on the diaphragm and the rocker arm would open the valve until the PSI in the second stage equaled the ambient pressure outside of the second stage. When they are equal the valve closes and the pressure is equalized. If you slowly brought the pressurized second stage back to the surface the ambient pressure would become less than the PSI in the second stage and the pressure would equalize by venting though the exhaust valve.

That being said here’s how the open circuit SCUBA regulator system works. (It’s called open circuit because the air is exhausted and not returned to the supply).  As you start your dive with each breath you take it reduces the PSI inside the regulator causing the ambient pressure to push in the on the second stage diaphragm and pushes on the rocker arm opening the valve in the second stage. It only opens the valve enough to deliver ambient pressure and closes the valve when the pressure is equal.  The air delivered to the second stage reduces the intermediate pressure in the low pressure hose and the low pressure chamber in the first stage. When the pressure in the first stage chamber drops below 135-140 PSI the first stage spring pushes on either the piston or the diaphragm opening the first stage valve. When the intermediate pressure returns to 135-140 PSI it pushes back on the spring and closes the valve.  Every time you take a breath the cycle is repeated.

Because your life depends upon your regulator it pays to keep your regulator in top shape. Most manufacturers recommend inspection every other year and rebuild on the off years.  Although you could make your own rebuild kits it highly recommended that you only use the manufacturer’s kits.

By the way, we are looking for guest bloggers to share their diving stories.  Where have been diving lately?  Tell us stories about your training.  Share some trip photos and a report about a dive destination.  The information in the blog must be your own words, and accompanied by a photo or two. Please send it in Word document form to mantadiveshop{at} a yahoo account. (Security against bots. Sorry!)  Just to sweeten the pot, if we post your blog, you will receive a FREE Manta Divers T-shirt!

As always, like us on Facebook, share the blog and/or leave a comment for some feedback. If you have a question for Mike, let us know in a comment! Until next time, cheers!

Sunday, February 10, 2013

Tank-full for Safety Inspections

While we stay busy in the winter months with classes and Try Scuba’s it’s also that time of the year at the dive shop when all the equipment gets the once over. We keep an eye on all of our equipment throughout the year but during the slower winter months every piece of equipment and gear gets an in depth inspection. It starts with the TANKs. All tanks or cylinders as they are referred to by the US Department of Transportation (DOT) and Compressed Gas Association (CGA) are required to undergo an annual visual inspection. Most SCUBA (Self Contained Underwater Breathing Apparatus) cylinders also need a hydro test every five years.  SCBA (Self Contained Breathing Apparatus) used by HAZMAT teams and Fire Departments as well as Fiber Wrapped Paintball cylinders are often on different Hydro  schedules. 

Last Saturday was tank inspection day.  I try to keep all the tanks that we use at Manta Dives inspected within the same month.  At Manta Divers we maintain 33 tanks.  24 of the tanks are Manta Divers rental fleet as well as 9 customers’ tanks that live at Manta Divers in exchange for letting us use them in a pinch. While most of the tanks are standard Aluminum S80 and S63 cubic ft. with 3000 lb working pressure we also have Steel  63 and 100 cubic ft. cylinders with working pleasures of 3442 lb.  


So why is it important to have tanks inspected annually?  Why is it important to the person filling your tank to do an exterior inspection of your tank and look for that inspection sticker on your tank?  If you could ask Hector Duran of Amigos Del Mar dive shop in San Pedro, Belize he would tell you that damaged tanks rupture and explode when re-filling them.  A twenty year veteran of the dive industry he died in October 2012 when a tank ruptured while he was refilling it.  Its protocol to check the Hydro stamp, Visual Inspection Sticker (VIS) as well as inspect the cylinder for any damage or condition that may of occurred since the VIS.  We look for deep scratches, gouges, dings, scratches, dents or extreme heat damage (fire).  It is still unclear why the tank Hector was filling exploded, but if he skipped any of the usual protocols, it could have led to his death.


It’s not just for the benefit of the person filling the tank to do the prefill inspection.  On September 11, 2011 Russell Vanhorn of St. Petersburg FL. died when the tank he was carrying into his condo exploded.  Although the cause has not been pinpointed all evidence points to a damaged tank that was filled without a prefill inspection or the tank was filled beyond its working pressure.  That’s why we follow the  protocols, OUR  SAFETY DEPENDS ON IT.


So what’s in an inspection?  It breaks down into 3 parts.

#1 - Exterior Inspection 

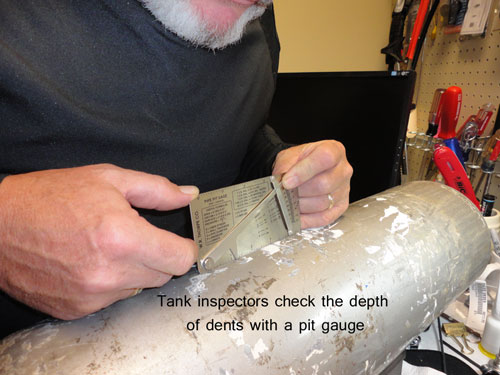
  • Look for scratches, dents, gouges, dings.  Any of these over .015 inch depth  can be reason to condemn a tank.
  • Look for heat or fire damage.
  • Use a straight edge to check the tank hasn’t bulged from overfilling.
  • Remove stickers and inspect the paint to insure that no repainting or repairs have been made
  • Remove the boot and clamps to look for pitting or rust that could compromise the cylinder.
  • For steel tanks we do a Hammer Tone Test.  Holding the tank off the floor by the valve I strike the tank with a fiberglass hammer. It should sound like a bell.  If it doesn’t the tank is most likely rusted out inside.

#2 - Interior Inspection
  • Remove the valve and turn the tank over on a clean paper to determine if there are any particles or contaminates in the tank.
  • After turning the cylinder upright “sniff test” the cylinder.  An oily or burnt plastic smell reveals that the cylinder has been refilled at less than a quality refilled station or off of a construction compressor.  Any odor will require the cylinder to be washed and dried to eliminate contamination.
  • After inserting an inspection light we look for pitting, oxidation, rust or other issues.  If pitting is present it is tested to determine if it isn’t extensive enough to condemn the tank. In aluminum tanks oxidation dust can be rinsed out in a wash. In steel tanks the rust is removed by tumbling with an aggregate or by whipping with special tools. The interior should be clean and dry.
  • A light and mirror is used to inspect the underside of the neck and threads.
  • I use a VISUAL PLUS system to inspect the threads. It’s like a microscope that allows the inspector to see every detail of the threads.
  • On Aluminum tanks manufactured prior to 1990 it’s a DOT requirement that the threads are EDDY tested every 5 years with the Hydro. Prior to 1990, some tanks were made from a 6359 alloy that was susceptible to thread cracking under a sustained load or pressure.  I EDDY test all aluminum tanks manufacture pre 1990 annually.  During an EDDT test a coil probe sends an electromagnetic current though the conductive threads.  A second receiver coil picks up the current and detects the presence of cracks or flaws.  If it fails the EDDY it’s a condemned tank.
  • The last thing we look at is the O-ring gland. It’s a depression in the neck of the tank that the O-ring that seals the valve sits in . It must be clean and free of scratches to seal the pressure in the tank.

#3 - Valve Inspection
  • The threads on the valve are inspected for damaged  or missing threads.
  • The dip tube is inspected to insure that its tight in place. (  the dip tube protects  you if there was water in the tank for whatever reasons it wouldn’t go in your regulator if you were upside down)
  • We check to the burst disc to make sure it’s in good condition and the right pressure.
  • We check the operation of the valve to make sure operating smoothly,
  • We check both of the O-rings. If either looks questionable we replace.

I hope this was informational about tanks, tank inspections and their importance. More knowledge makes us all better divers, but reading this blog should in no way be considered a class to certify you as a tank inspector or fill operator. Remember to check that your tank has been inspected by a professional and be aware of any damage to the tank.

Thank you for reading. As always, leave a comment and give us some feedback, share the blog on Facebook or tweet us out to your friends. Until next time, cheers.