Showing posts with label Mike's Tips. Show all posts

Sunday, June 29, 2014

Stories from the Repair Bench

Picture #1
It’s always sad when divers bring me gear that can’t be fixed or repaired, not because it got to be too old but because of improper care.  It’s also expensive. Take the diver whose dive computer gave up the ghost prematurely.  It didn’t have to happen. After close examination it was obvious that the diver’s air integrated computer with quick release  had not been properly rinsed after diving. ( see picture 1) Note the salt build up on the threads, O-ring and the bayonet quick release. It was obvious that without proper rinsing the salt dried the O-ring allowing salt and moisture to get into the computer.  End of computer.  You should always thoroughly rinse your gear at the end of every dive day. If you have done repetitive dive over many days it’s always a good idea to soak your gear overnight after washing it with recommended shampoos. This is true in fresh or salt water. While the aforementioned computer was the victim of salt water , fresh water can be just as harmful. Improperly rinsing in fresh water grows harmful bacteria. Check out picture #2. This diver regularly “Dipped” his regulator after diving to rinse it. That green stuff in and around the mouthpiece is mold. I didn’t take pictures of the interior but they were just as bad. It could have been avoided by flushing the inside of the regulator with clean water.
Picture #2

There are a lot of divers out there doing their best to keep repair technicians busy.  I was recently talking to another technician from the Chicago area and we were both sharing equipment horror stories. At one point he got out a box of little baggies containing things that they had found in regulators over the years. There was sand, gravel, hair, shells and plant to name a few. The best was the regulator that a diver brought with the complaint that it that tasted funny. No matter what tank he put it on the air had a horrible taste. My friend held up the baggie t contained the cause of the bad taste. It was a frog the got up into the regulator and after passing on dried to the inside of the regulator box. GROSS!  Remember, take care of your gear and above all, rinse all frogs out of it!


MIKE

Sunday, April 13, 2014

Let the Schlepping Begin

With the long winter over (I think its over.)I’m looking forward to the dive season opening up. The schlepping begins well before the season though. What this schlepping you say?  I looked it up in the dive dictionary:

Schlepping (sch-lep-ing) : the logistics of the  coordination, handling, loading , unloading and movement of copious heavy dive gear, repeatedly.

So when you help load the tanks, gear bags and other equipment into the dive van or trailer your helping to schlep the gear. Schlepping is an integral to diving and is actually part of the Dive Master training.  Ask Tater as he has completed his dive master certification.  We can’t dive if the gear doesn’t get there.

There’s a lot of background to schlepping that most people never see. Start with filling the tanks. It looks like you just hook up the tank to the fill whip and open the valve. What you don’t see is the filler’s quick inspection to the tanks. It is important to make sure that no damage that result in an explosive situation has occurred since the last fill. All of our tanks get the mandatory annual inspection every February.  After the tanks are filled, we stage the tanks for loading. Most of the summer, I load them directly in the trailer after filling.  

When we load the van and trailer a lot of thought goes into where the weight is placed in the vehicles.  In the van we try to keep the combined weight of passengers, gear on trailer tongue weight below the recommended tire load rating for the tires on the van. On my list to do this spring is to take the van and trailer to Kenosha Tire to have the tires inspected, much like you have you regulator and gear inspected. They may determine that new tires will be in order.  The same weight issues are considered in loading the trailer. We try to balance the heaviest weight over the axle.  We also pay attention to the distribution of weight from the front of the trailer to the rear. Too much weight towards the front of the trailer causes excessive tongue weight thus putting excessive weight on the rear of the van and exceeds the load rating on the rear tires.  Too much weight towards the rear of the trailer causes the tongue to lift the back of the van and the trailer will sway back and forth. This shifts the weight of the cargo from one trailer tire to the next. When most of the weight is shifted to one tire it exceeds the recommended load and the tire overheats and blows out.  In addition to balancing the loads, inspection of the van, trailer and tires is a regular ongoing activity. I even check the temperature of the tires at every pit stop with a PYROMETER while on the road.  However, even with the balancing of the load and constant inspecting, occasionally you can still blow out a tire.


 Last summer on our way to recover the famous Ghost Anchor of Butternut Lake we blew a trailer tire by Appleton. (We blamed the blow out on the Ghost Witch of Butternut Lake. Legend states that she placed a curse on anyone attempting to get the Ghost Anchor out of the lake. Later that day she threw a deer at the trailer. That’s another story though.)  We had been diligent on balancing the load and checking the vehicles and tires but still had a blowout. On the trip the tire temperature’s had been running between 105 to 110 degrees. The same temps that we ran all the way to Ohio and back a few weeks earlier.  As we were weighted just less than the Ohio trip we determined that the blown tire must have picked up a nail or other road debris and began to lose pressure.  This made the sidewall of the tire to bulge and flex caused the tire temperature to increase rapidly exploding the tire. The tire blew with such force that it took the fender right off the trailer. As the driver, I was happy that the load in the trailer was evenly balance as it made keeping control of the vehicles and getting off the road much safer. A few years ago I anticipated (as any good schelpper would) that this could happen thus the tool box and spare tire that I had welded to the front of the trailer. We were back on the highway in about 20 minutes. Just before we got back on the road I checked the tire temps on the van and trailer. It was about 20 minutes after the blow out and they were about 100 degrees. The blown out tire was still registering well over 180 degrees. I wonder what it was when it blew.

In the next few weeks I will be picking up the trailer from storage. It’s been in a heated warehouse during this nasty winter. Before the season starts I hope to finally complete the interior and install some lighting.  If I don’t get the interior finished and lights installed you can still be assured the inspections will get done and all safety issues addressed.  It’s just part of the schlepp.


Mook

Sunday, March 9, 2014

The Six Things of Regulator Maintenance

Recently my repair area has been really busy. Good divers want to make sure their gear is well maintained and working well when you need it. The number one piece of equipment divers want to keep well maintained is your regulator for obvious life support reasons. It amazes me that from time to time I will get a regulator in that hasn’t been serviced in years yet the diver has been diving with it right along. The “if it’s not broke, don’t fix it” idea just doesn’t fit with regulators.  Even if it hasn’t been used for a couple of years your regulator should be serviced as o-rings, seats and poppets can dry out and fail when you’re diving. Not the surprise that I want at 60 ft. So her it goes:

Six things you need to know about regulator maintenance.

Number 1
Have your regulator inspected every other year and rebuilt in the years between inspection years. This is the schedule recommended by most regulator manufacturers. If a regulator if in a high use situation it’s recommended that the regulator is serviced more frequently. There are exceptions such as the Atomic T3 regulator, which requires rebuilding every 3 years or 300 dives. When your regulator is serviced make sure that the tech uses only manufacturers parts kits AND that they change all the hose O-rings as well.


Number 2
Manufacturers don’t require that the tech replace the exhaust vales as part of the  rebuild of the second stage and octo. It’s recommended that the tech inspect them and replace them only if they show signs of wear or they are leaking. I replace them every time I rebuild, since as with O-rings, they are made of silicone or rubber and dry out with time.


Number 3
Although the manufacturers mostly call for the second stage diaphragm to be replaced only when they are torn or deformed, I replace the diaphragm on every third rebuild. Again, like the O-rings and the exhaust valve it’s made of silicone rubber and can dry out and fail. They cost about $12 and I don’t charge anything to install. That’s $2 a year for peace of mind.


Number 4
More and more of our divers are using comfort swivels on their second stages and HP Quick disconnects for their computers. Both of these upgrades have O-rings and need to be serviced at the same time as your regulator. It shortens your dive if there is steady stream of bubbles coming from your swivel or QD.


Number 5
What’s an HP air-spool and why should you be concerned about it?  An air spool is a tiny pin between your High Pressure gauge and your HP hose. It has two little O-rings that seal the connection. It’s not typically part of the regulator rebuild or the rebuild kit I change them N/C with every rebuild. It adds security that you won’t have a blow out and have to miss a dive.


Number 6
Even if you haven’t done a lot of dives during the year you should change the battery in your computer at least once a year. Every year and absolutely before a dive trip. The cost before the trip is less than having to rent a computer during the trip.

These are the six things to think about on servicing your regulator. If there was a seventh, I would say don’t wait until the week before your trip or the beginning of the season to get your regulator in shape.


Mike (mook)

Sunday, March 24, 2013

Well Regulated


Well, we received a request for another techie blog, so we turn to out resident equipment guy, Mike!


Customers and divers often ask me to how a regulator works and why it’s called a Regulator. The second part of the question is easy. It’s called a regulator because the first stage regulates the pressure from the tank to the 2nd stage. It takes the pressure from a full tank at 3000 PSI to 135-140 PSI in the low pressure hose between the 1st and 2nd stage. This is called the intermediate pressure. Because your respiratory system can only tolerate a differential of about .14 atm/bar you wouldn’t be able to breathe though a hose at 10 ft.   The increased atm/bar would be enough to not allow you to draw in a breath of air. The regulator delivers air at a pressure the same as the pressure of the water surrounding you and continues to increase or decrease the pressure as the exterior water pressure changes around your body. The regulators that we use today are called open circuit regulators.

Scuba regulators are also called demand regulators because they deliver air on demand when you inhale. First stages generally are either a piston or diaphragm design. They both use external ambient water pressure and a spring to open the valve inside the first stage when the pressure on the low pressure side of the 1st stage drops below 135-140 PSI.  In the piston regulator the external water pressure and primarily the spring forces the valve open when the pressure drops on the low pressure side of the regulator. As pressure comes back to the intermediate pressure the piston moves back and closes the valve. The spring does most of the work but if the spring chamber was not open to the water coming and going the chamber would create a vacuum and the valve would not be able to open or close. To set the intermediate pressure on a piston regulator the unit must be disassembled and shims added or removed to get the right spring setting.  

A diaphragm regulator works on the principle of an open circuit system with one major difference. In a piston model, the valve set remains fixed and the valve orifice on the end of the piston moves opening and closing the valve.  On a diaphragm regulator, when the intermediate pressure drops on the low pressure side, the spring pushes on the diaphragm that pushes on a pin that opens the valve by pushing the valve seat away from the valve orifice, opening the valve. As the intermediate pressure returns to the intermediate chamber it pushes the diaphragm in the opposite direction and it closes the valve maintaining 135-140 PSI in the low pressure supply line.

The second stage is the final piece to the SCUBA system. There are a variety of internal designs in the second stage ranging from a simple rocker arm and single spring to a more complicated shuttle valve and multiple spring designs. They all deliver breathing air but the shuttle valve second stages are much easier breathing. (Manta divers only sells the better balanced first stage and shuttle valve second stages regulators. The Atomic Z2, Aqua Lung Legend LX Supreme and Titan LX Supreme are the only regulators that you will find in our rental Fleet). The diagram attached is a rocker arm and spring design. So here’s how they work. The air in the second stage is always equal to the ambient pressure on the outside of the regulator whether you’re at the surface or at depth.  If you closed up the mouth piece on a pressurized second stage and lowered it down to 100Ft depth, all the way down the ambient pressure would push on the diaphragm and the rocker arm would open the valve until the PSI in the second stage equaled the ambient pressure outside of the second stage. When they are equal the valve closes and the pressure is equalized. If you slowly brought the pressurized second stage back to the surface the ambient pressure would become less than the PSI in the second stage and the pressure would equalize by venting though the exhaust valve.

That being said here’s how the open circuit SCUBA regulator system works. (It’s called open circuit because the air is exhausted and not returned to the supply).  As you start your dive with each breath you take it reduces the PSI inside the regulator causing the ambient pressure to push in the on the second stage diaphragm and pushes on the rocker arm opening the valve in the second stage. It only opens the valve enough to deliver ambient pressure and closes the valve when the pressure is equal.  The air delivered to the second stage reduces the intermediate pressure in the low pressure hose and the low pressure chamber in the first stage. When the pressure in the first stage chamber drops below 135-140 PSI the first stage spring pushes on either the piston or the diaphragm opening the first stage valve. When the intermediate pressure returns to 135-140 PSI it pushes back on the spring and closes the valve.  Every time you take a breath the cycle is repeated.

Because your life depends upon your regulator it pays to keep your regulator in top shape. Most manufacturers recommend inspection every other year and rebuild on the off years.  Although you could make your own rebuild kits it highly recommended that you only use the manufacturer’s kits.

By the way, we are looking for guest bloggers to share their diving stories.  Where have been diving lately?  Tell us stories about your training.  Share some trip photos and a report about a dive destination.  The information in the blog must be your own words, and accompanied by a photo or two. Please send it in Word document form to mantadiveshop{at} a yahoo account. (Security against bots. Sorry!)  Just to sweeten the pot, if we post your blog, you will receive a FREE Manta Divers T-shirt!

As always, like us on Facebook, share the blog and/or leave a comment for some feedback. If you have a question for Mike, let us know in a comment! Until next time, cheers!

Sunday, February 10, 2013

Tank-full for Safety Inspections

While we stay busy in the winter months with classes and Try Scuba’s it’s also that time of the year at the dive shop when all the equipment gets the once over. We keep an eye on all of our equipment throughout the year but during the slower winter months every piece of equipment and gear gets an in depth inspection. It starts with the TANKs. All tanks or cylinders as they are referred to by the US Department of Transportation (DOT) and Compressed Gas Association (CGA) are required to undergo an annual visual inspection. Most SCUBA (Self Contained Underwater Breathing Apparatus) cylinders also need a hydro test every five years.  SCBA (Self Contained Breathing Apparatus) used by HAZMAT teams and Fire Departments as well as Fiber Wrapped Paintball cylinders are often on different Hydro  schedules. 

Last Saturday was tank inspection day.  I try to keep all the tanks that we use at Manta Dives inspected within the same month.  At Manta Divers we maintain 33 tanks.  24 of the tanks are Manta Divers rental fleet as well as 9 customers’ tanks that live at Manta Divers in exchange for letting us use them in a pinch. While most of the tanks are standard Aluminum S80 and S63 cubic ft. with 3000 lb working pressure we also have Steel  63 and 100 cubic ft. cylinders with working pleasures of 3442 lb.  


So why is it important to have tanks inspected annually?  Why is it important to the person filling your tank to do an exterior inspection of your tank and look for that inspection sticker on your tank?  If you could ask Hector Duran of Amigos Del Mar dive shop in San Pedro, Belize he would tell you that damaged tanks rupture and explode when re-filling them.  A twenty year veteran of the dive industry he died in October 2012 when a tank ruptured while he was refilling it.  Its protocol to check the Hydro stamp, Visual Inspection Sticker (VIS) as well as inspect the cylinder for any damage or condition that may of occurred since the VIS.  We look for deep scratches, gouges, dings, scratches, dents or extreme heat damage (fire).  It is still unclear why the tank Hector was filling exploded, but if he skipped any of the usual protocols, it could have led to his death.


It’s not just for the benefit of the person filling the tank to do the prefill inspection.  On September 11, 2011 Russell Vanhorn of St. Petersburg FL. died when the tank he was carrying into his condo exploded.  Although the cause has not been pinpointed all evidence points to a damaged tank that was filled without a prefill inspection or the tank was filled beyond its working pressure.  That’s why we follow the  protocols, OUR  SAFETY DEPENDS ON IT.


So what’s in an inspection?  It breaks down into 3 parts.

#1 - Exterior Inspection 

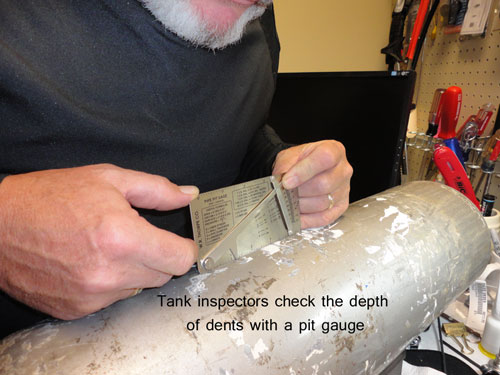
  • Look for scratches, dents, gouges, dings.  Any of these over .015 inch depth  can be reason to condemn a tank.
  • Look for heat or fire damage.
  • Use a straight edge to check the tank hasn’t bulged from overfilling.
  • Remove stickers and inspect the paint to insure that no repainting or repairs have been made
  • Remove the boot and clamps to look for pitting or rust that could compromise the cylinder.
  • For steel tanks we do a Hammer Tone Test.  Holding the tank off the floor by the valve I strike the tank with a fiberglass hammer. It should sound like a bell.  If it doesn’t the tank is most likely rusted out inside.

#2 - Interior Inspection
  • Remove the valve and turn the tank over on a clean paper to determine if there are any particles or contaminates in the tank.
  • After turning the cylinder upright “sniff test” the cylinder.  An oily or burnt plastic smell reveals that the cylinder has been refilled at less than a quality refilled station or off of a construction compressor.  Any odor will require the cylinder to be washed and dried to eliminate contamination.
  • After inserting an inspection light we look for pitting, oxidation, rust or other issues.  If pitting is present it is tested to determine if it isn’t extensive enough to condemn the tank. In aluminum tanks oxidation dust can be rinsed out in a wash. In steel tanks the rust is removed by tumbling with an aggregate or by whipping with special tools. The interior should be clean and dry.
  • A light and mirror is used to inspect the underside of the neck and threads.
  • I use a VISUAL PLUS system to inspect the threads. It’s like a microscope that allows the inspector to see every detail of the threads.
  • On Aluminum tanks manufactured prior to 1990 it’s a DOT requirement that the threads are EDDY tested every 5 years with the Hydro. Prior to 1990, some tanks were made from a 6359 alloy that was susceptible to thread cracking under a sustained load or pressure.  I EDDY test all aluminum tanks manufacture pre 1990 annually.  During an EDDT test a coil probe sends an electromagnetic current though the conductive threads.  A second receiver coil picks up the current and detects the presence of cracks or flaws.  If it fails the EDDY it’s a condemned tank.
  • The last thing we look at is the O-ring gland. It’s a depression in the neck of the tank that the O-ring that seals the valve sits in . It must be clean and free of scratches to seal the pressure in the tank.

#3 - Valve Inspection
  • The threads on the valve are inspected for damaged  or missing threads.
  • The dip tube is inspected to insure that its tight in place. (  the dip tube protects  you if there was water in the tank for whatever reasons it wouldn’t go in your regulator if you were upside down)
  • We check to the burst disc to make sure it’s in good condition and the right pressure.
  • We check the operation of the valve to make sure operating smoothly,
  • We check both of the O-rings. If either looks questionable we replace.

I hope this was informational about tanks, tank inspections and their importance. More knowledge makes us all better divers, but reading this blog should in no way be considered a class to certify you as a tank inspector or fill operator. Remember to check that your tank has been inspected by a professional and be aware of any damage to the tank.

Thank you for reading. As always, leave a comment and give us some feedback, share the blog on Facebook or tweet us out to your friends. Until next time, cheers.