Sunday, February 24, 2013

Oh boy! Buoyancy!


As I prepared for this weekend’s Buoyancy Clinic at the Rec Plex pool, I thought back to when I was a new diver.  In class, I imagined myself mastering the buoyancy skill quickly; after all, how hard could it be?  Air in to go up, air out to go down!  I learned soon enough, however, that it was not nearly as easy in the water as it had been in my head.
We all were taught in class that good buoyancy is valuable not only because it can help protect the diver and the marine environment from harm, but it helps to preserve underwater visibility.  Most of all, though, is that it helps the diver to relax and exert less energy, which leads to decreased air consumption.
Once new divers are free of the stress of having to demonstrate their underwater skills, and they start to dive without their instructor, their “blinders” come off.  They see themselves as a peer to other certified divers, but recognize that they still have a way to go with regard to their technique.   They start to understand the consequences of losing buoyancy and stirring up the bottom of the lake.  They see that some divers are floating without finning or struggling to maintain position in the water.  Most of all, they wish that they were not always the first one back on the boat with only 500psi.


Also, if you encounter a plant in a pool, remain calm.
Paniked breaths waste air!

So how does a diver improve his buoyancy?

Number 1: Weights
  • Use only as much as you need.  Newer divers tend to be overweighted because they have not yet gained enough confidence in their skills to relax.  Their breathing rate is increased due to nervousness and the energy expended making lots of unnecessary movements, such as waving their hand to descend or keep themselves from rolling over.  The more relaxed the diver, the less weight they need.  The added bonus of losing a little lead, is that the diver’s descent rate decreases allowing more time for equalizing.  Perform a buoyancy check at the beginning of each dive and reassess your weight needs.  With your wetsuit fully saturated with water and no air is trapped inside, deflate your BC and hold a full breath of air.  DO NOT MOVE!  If you are floating at eye level, then you are close to the right weight.  When you exhale all of your breath, ideally, you will float down like a leaf.  It will probably be necessary to take an additional quick breath in to allow you to continue to descend, but once you have a couple of feet of water above you, breathe normally and continue to your planned depth.
  • Make sure you are using the right configuration of weights.  Many BC’s have “trim pockets” which allow the diver to move some of the weight towards his head.  This works to keep the diver’s fins in line with his body, rather than trailing below him.  When a diver is in a more horizontal position, it has the added advantage of decreasing inadvertent fin contact with aquatic life.  Conversely, if the diver tends to be in more of a “head down” position, moving the weights lower by lengthening his BC straps transfers the weigh toward the fins and aids in a more horizontal posture in the water.


Number 2:

Make sure your BC fits.  Occasionally, the BC a diver is issued during class or at the rental counter at the dive resort may not be exactly the right fit. If the BC is too large, it will be sloppy when trying to turn or move in the water. At times it can feel as though the tank is sliding off your back. A BC that is too small may not provide adequate lift.  The BC should be snug without restricting breathing or movement.  Owning your own BC makes it easier to fine tune buoyancy because it is the right size and the fact that the diver is familiar with it will decrease stress.
Number 3:
Breathe slow and deep.  Slow, deep breathing is used in relaxation classes for good reason: it has the physiological result of slowing your heart beat and therefore your breathing rate.  It also has a calming effect, reducing stress and tension.  Remember that your BC is your course adjustment for buoyancy, but your lungs are the fine tune. As a diver inhales and exhales, he moves up and down in the water.  When the breathing is steady and the rhythmic up and down movement predictable, divers can anticipate their position and use that to their advantage.

Number 4:
Check your gear.  Know that whenever you add or subtract gear, even something as minor as a flashlight, your buoyancy can be affected.  Certainly any major change, such as a new BC or wetsuit, or change of environment, such as saltwater to fresh may warrant a significant change in the actual amount of lead you carry, whereas adding a camera may only necessitate shifting weights to a lower or higher position on your body.

Number 5:
Practice.  I estimate that when a diver really works on his buoyancy, it takes about 15 good dives to really start mastering the skill.  If a diver does not work on it of course it will take longer.  Get out there and dive. If you want some expert coaching, choose Peak Performance buoyancy for one of your Advanced Open Water adventure dives, or take the Peak Performance Buoyancy Specialty course.  

Please note: Hovering is not the same as levitation 

Good buoyancy is a key skill to master if a diver wants to really enjoy the sport, but it comes naturally only to a lucky few.  The rest of us must work on it and find those keys that will unlock Find a dive buddy and learn the joy and freedom that proper buoyancy gives you.

If you are interested in improving your buoyancy, we have added another clinic to the schedule.  Join us at the Rec Plex on March 9 at 8am.  Prior registration is required. Stop in at the shop and get signed up! As always, please like us on Facebook, share this blog on Twitter or leave a comment and give us some feedback.  We would love to hear from you!  Tune in next week for “6 things you need to know so you won’t be “that guy” on the dive boat.”

Sunday, February 17, 2013

GUEST BLOG: The Tale of Tater

Allow me to introduce myself to the Team Manta world.

They call me.... Tater.
Hello, they call me Tater and I am a Scubaholic.   Ok now that we have the formalities out of the way, why is it that I am writing on the Manta Blog?   I’ve asked myself the same question.  I’m not much of a writer or even a good speaker for that matter and this is definitely my first blog post of any kind.  The reason I am here is that team Manta at one point asked me to be a guest blogger about my experiences of being a Divemaster Candidate (DMC).  When my instructor, Lisa brought up, I pretty much ignored the request, hoping it would go away!  Actually it did, so I thought I had escaped.  The more I thought about it though, the more I came to the conclusion that one of the many reasons I am a DMC is that I enjoy SCUBA so much that I not only enjoy the dives, I enjoy sharing SCUBA with others.   So while I hate spelling, grammar and word-smithing, I will give it a shot at sharing my experiences with you and hope it helps someone else with questions of what it might be like.

I am on what I call a slow track towards being a DM in that I am in no rush to get ‘certified’ and feel the longer it takes, the more experience I will have when that time comes.  In other words, I have plenty of time for blogs.  So where do I start?


It all started when I was 8year old…Just kidding, but only sort of.   I am of the generation that actually watched Mike Nelson and Sea Hunt when it was on TV and the signal came over an antenna!! Imagine that!!  I was also a fan of Flipper and Jacques Cousteau.  So the seed was actually planted when I was little.  
When I was a freshman in college you were required to take a fitness course to graduate (wow) and one of the options was SCUBA.  I couldn’t have afforded it on my own, but as part of my tuition it was pretty much free to me, making it an easy choice.  I got certified through UW-Parkside by Water World in December of 1980 at the Racine Quarry.  I loved it then and used to drool over the photos in Skin Diver Magazine each month and dream about tropical diving.  But alas I didn’t get much actual diving in and my struggle to carve out a life pretty much put SCUBA on the back burner.


Fast forward to 2010: Having never taken real vacations (other than camping) when our kids were young, my wife and I decided to go someplace exotic and tropical for our 25th anniversary.   Searching the internet for places to go, I was reminded of the pictures from Skin Diver and started to think again about SCUBA.  Discussing my possible plans with co-workers, I discovered one of them was also a certified diver, but he too hadn’t dived in a while.  We decided to take a refresher course together.  I did an internet search for local dive shops and sent off some email questions.  Based on the responses and a discussion with potential shops, I felt that Manta would be the best shop to work with.  My dive buddy (J.0) and I took the refresher course with Manta.  After the book review, we did a brush up in the pool, and then some open water dives in local quarries with team Manta and also on our own.  I was hooked again. 


I did make it to the Bahamas’ and got in a couple of fantastic dives.  Lot’s of firsts for me; my first time in the ocean, boat dive, drift dive, shark sighting (within 3 minutes of hitting the water), Rays, Parrot fish, Hog Fish and much more.  I was not only hooked, I swallowed the hook.


Fish, fish, everywhere!


From that time on, I wanted to increase my skills and diving knowledge.  I began taking more advanced/specialty classes with Manta.  I’ll share some of that training and what it was like in future posts.  Until then, check out the Manta Calendar, maybe I’ll see you in a class.

Sunday, February 10, 2013

Tank-full for Safety Inspections

While we stay busy in the winter months with classes and Try Scuba’s it’s also that time of the year at the dive shop when all the equipment gets the once over. We keep an eye on all of our equipment throughout the year but during the slower winter months every piece of equipment and gear gets an in depth inspection. It starts with the TANKs. All tanks or cylinders as they are referred to by the US Department of Transportation (DOT) and Compressed Gas Association (CGA) are required to undergo an annual visual inspection. Most SCUBA (Self Contained Underwater Breathing Apparatus) cylinders also need a hydro test every five years.  SCBA (Self Contained Breathing Apparatus) used by HAZMAT teams and Fire Departments as well as Fiber Wrapped Paintball cylinders are often on different Hydro  schedules. 

Last Saturday was tank inspection day.  I try to keep all the tanks that we use at Manta Dives inspected within the same month.  At Manta Divers we maintain 33 tanks.  24 of the tanks are Manta Divers rental fleet as well as 9 customers’ tanks that live at Manta Divers in exchange for letting us use them in a pinch. While most of the tanks are standard Aluminum S80 and S63 cubic ft. with 3000 lb working pressure we also have Steel  63 and 100 cubic ft. cylinders with working pleasures of 3442 lb.  


So why is it important to have tanks inspected annually?  Why is it important to the person filling your tank to do an exterior inspection of your tank and look for that inspection sticker on your tank?  If you could ask Hector Duran of Amigos Del Mar dive shop in San Pedro, Belize he would tell you that damaged tanks rupture and explode when re-filling them.  A twenty year veteran of the dive industry he died in October 2012 when a tank ruptured while he was refilling it.  Its protocol to check the Hydro stamp, Visual Inspection Sticker (VIS) as well as inspect the cylinder for any damage or condition that may of occurred since the VIS.  We look for deep scratches, gouges, dings, scratches, dents or extreme heat damage (fire).  It is still unclear why the tank Hector was filling exploded, but if he skipped any of the usual protocols, it could have led to his death.


It’s not just for the benefit of the person filling the tank to do the prefill inspection.  On September 11, 2011 Russell Vanhorn of St. Petersburg FL. died when the tank he was carrying into his condo exploded.  Although the cause has not been pinpointed all evidence points to a damaged tank that was filled without a prefill inspection or the tank was filled beyond its working pressure.  That’s why we follow the  protocols, OUR  SAFETY DEPENDS ON IT.


So what’s in an inspection?  It breaks down into 3 parts.

#1 - Exterior Inspection 

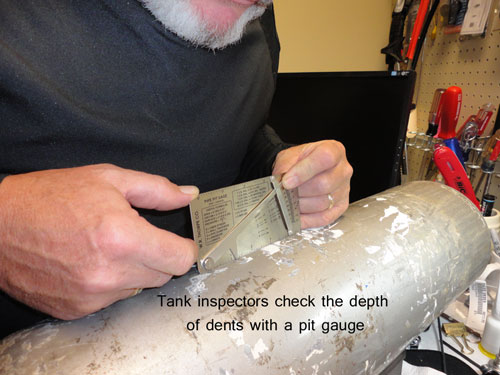
  • Look for scratches, dents, gouges, dings.  Any of these over .015 inch depth  can be reason to condemn a tank.
  • Look for heat or fire damage.
  • Use a straight edge to check the tank hasn’t bulged from overfilling.
  • Remove stickers and inspect the paint to insure that no repainting or repairs have been made
  • Remove the boot and clamps to look for pitting or rust that could compromise the cylinder.
  • For steel tanks we do a Hammer Tone Test.  Holding the tank off the floor by the valve I strike the tank with a fiberglass hammer. It should sound like a bell.  If it doesn’t the tank is most likely rusted out inside.

#2 - Interior Inspection
  • Remove the valve and turn the tank over on a clean paper to determine if there are any particles or contaminates in the tank.
  • After turning the cylinder upright “sniff test” the cylinder.  An oily or burnt plastic smell reveals that the cylinder has been refilled at less than a quality refilled station or off of a construction compressor.  Any odor will require the cylinder to be washed and dried to eliminate contamination.
  • After inserting an inspection light we look for pitting, oxidation, rust or other issues.  If pitting is present it is tested to determine if it isn’t extensive enough to condemn the tank. In aluminum tanks oxidation dust can be rinsed out in a wash. In steel tanks the rust is removed by tumbling with an aggregate or by whipping with special tools. The interior should be clean and dry.
  • A light and mirror is used to inspect the underside of the neck and threads.
  • I use a VISUAL PLUS system to inspect the threads. It’s like a microscope that allows the inspector to see every detail of the threads.
  • On Aluminum tanks manufactured prior to 1990 it’s a DOT requirement that the threads are EDDY tested every 5 years with the Hydro. Prior to 1990, some tanks were made from a 6359 alloy that was susceptible to thread cracking under a sustained load or pressure.  I EDDY test all aluminum tanks manufacture pre 1990 annually.  During an EDDT test a coil probe sends an electromagnetic current though the conductive threads.  A second receiver coil picks up the current and detects the presence of cracks or flaws.  If it fails the EDDY it’s a condemned tank.
  • The last thing we look at is the O-ring gland. It’s a depression in the neck of the tank that the O-ring that seals the valve sits in . It must be clean and free of scratches to seal the pressure in the tank.

#3 - Valve Inspection
  • The threads on the valve are inspected for damaged  or missing threads.
  • The dip tube is inspected to insure that its tight in place. (  the dip tube protects  you if there was water in the tank for whatever reasons it wouldn’t go in your regulator if you were upside down)
  • We check to the burst disc to make sure it’s in good condition and the right pressure.
  • We check the operation of the valve to make sure operating smoothly,
  • We check both of the O-rings. If either looks questionable we replace.

I hope this was informational about tanks, tank inspections and their importance. More knowledge makes us all better divers, but reading this blog should in no way be considered a class to certify you as a tank inspector or fill operator. Remember to check that your tank has been inspected by a professional and be aware of any damage to the tank.

Thank you for reading. As always, leave a comment and give us some feedback, share the blog on Facebook or tweet us out to your friends. Until next time, cheers.

Sunday, February 3, 2013

Six Things you need to know about shore diving in Bonaire

As you know, I just returned from a wonderful week of shore diving in one of the Caribbean’s premier spots, Bonaire.  I love shore diving for the freedom it affords: start your dive when you want, stay as long as your air and decompression model allows, and stretch your dive planning skills.  However, since most divers traveling to the Caribbean only dive from boats, I thought it would be a good idea to share what I’ve learned about shore diving in Bonaire.

Number 1


Get a good pair of booties. Bonaire’s shore line is composed of coral rubble overlying a volcanic base.  With the weight of your tank and gear, it can be especially painful to on the feet.  You want something that will not only protect your feet on the terrain, but give you good traction on unstable ground.  Though not many entrances were thick with sea urchins, a thick soled bootie will give added protection from spines that you could accidentally step on.  Remember that if you change booties, though, especially to something a bit more substantial than you had, you need to make sure that they will still fit into your fins.
Everyone like good booties!
Number 2

Study a good guide book before going to familiarize yourself with the sites.  Look for a book that not only describes the site, but rates the ease of entry, the suitableness for snorkeling, current and other environmental conditions. Some areas, such as the south end of the island, have strong currents and the force with which the waves hit the shore makes the entry quite tricky.  Many of the entrances are a short walk from where you will park your truck, but others require a long walk down (and later up) stairs.  Some sites have easy entries, but the exit is a bit challenging.  At Oil Slick Leap, for example, the entry is a fun giant stride off the side of the island, but to get out, you need to climb a ladder. If you have a camera or heavy weights, you may want to enlist the help of your buddy and make the exit in several trips.  Don’t forget that many of the resorts have nice docks or ladders that provide easy access to their “house reefs,” so if you are not confident walking into the surf and dealing with waves, explore these sites.  You will have just as much fun.

Number 3
Check your air!  Before even leaving the dive shop verify that your tank is full. Many (less experienced) divers forget that once the tank has been used, the cap should not be replaced, so it is folly to assume that the tank is full because the cap is in place.  You do not want to get all the way to the north end of the island to discover you have only 1500psi for your whole dive.  Check that your air is on before entering the water.  This is easy to do: simply take a breath from your regulator while looking at the pressure gauge.  The needle will not move if the air is on.  Check your air often during the dive.  There is no DM there reminding you to monitor your pressure and everyone knows how easy it is to lose track of time when you are in sensory overload from all the wonderful marine life you are seeing.
Number 4
Once you arrive at your chosen dive site, take a look at the entry and plan the best path to enter. Then, walk in with your regulator in your mouth, especially if the surf is rough.  Waves often come in threes, a big wave followed by two smaller ones.  By keeping an eye on the wave action, you should be able to anticipate it, but if you get distracted, you could easily be swept off your feet, with waves rushing over you.  If your regulator is in your mouth, you can take your time to right yourself without fearing that you can’t breathe.  Occasionally it is best to get out just deep enough to float above the rocks and coral, then lie in the water and snorkel out to deeper water.  Don your fins as soon as is feasible.  

Number 5
Buddies must help each other with entries and exits.  Scope out all entrances with your buddy to determine the best route to take.  Look for a sandy channel between rocks.  Walk in together and help each other get fins on in water that is waist deep or deeper.  If you have cameras, one of you can gear up and get into the water with the help of the other. Then bring the camera out to the diver already in the water.  The second diver then gears up and walks in.  Upon the exit do the reverse.

Number 6
Look back at your exit point.  Bonaire has sites all along its shoreline and especially if there is a current at all, you could end up exiting by a site further down from where you entered.  That will result in a long walk in all your gear in order to get back to your truck.  Look for landmarks, such as a “Cargill” sign, or the slave huts or stacked beach debris.  When doing night dives, you can place two lights, one shallower than the other.  When returning, look for the lights and align yourself so the lights appear one on top of the other.  This will mark the direction you must take to exit exactly where you entered!

Even though Bonaire is known for its shore diving, you can still make arrangements to dive this island from a boat if schlepping your own gear does not appeal to you.  In fact, many sites, such as those around Klein Bonaire are only accessible by boat.  The bottom line is,  Bonaire offers something for every kind of diver and is an island not to be missed.

Next week Mike will impart his wisdom about scuba cylinders in “Tanks for the Memories”. As always feel free to follow the blog, share us on Facebook or tweet us out to your friends. Until next time, cheers!